As you might have read, Xamarin recently released the first of its Xcode 11 previews, which provide early access to in-progress Xamarin bindings for the new iOS and macOS SDKs. These are useful if you want to start working with new and updated frameworks like Sign in with Apple, PencilKit, SoundAnalysis and ARKit3 - all of which except for the latter are baked into the first preview. Even if you don't want to work with new frameworks, these previews let you test how your apps behave when targeting iOS13 - so you can find out whether changes like UIViewController.ModalPresentationStyle's defaulting to UIModalPresentationStyle.Automatic are good things or a bad things for you (ARBound, I'm looking at you 😾).
There's plenty of benefit to trying out the previews, but like every non-Xamarin.iOS 12.7.1.x build they suffer from one drawback - no Reflection.Emit!. You might be thinking - "What good is a preview release if I can't hot reload new PencilKit features in ARKit3 from an embedded REPL?!?" - which is exactly what I thought too. Don't worry though, if we're happy to get our our hands dirty, we can bake our own Xamarin.iOS Xcode 11 Preview with Reflection.Emit available, and even skip ahead of the official preview release cycle while we're at it!
Do I need to bother with this?
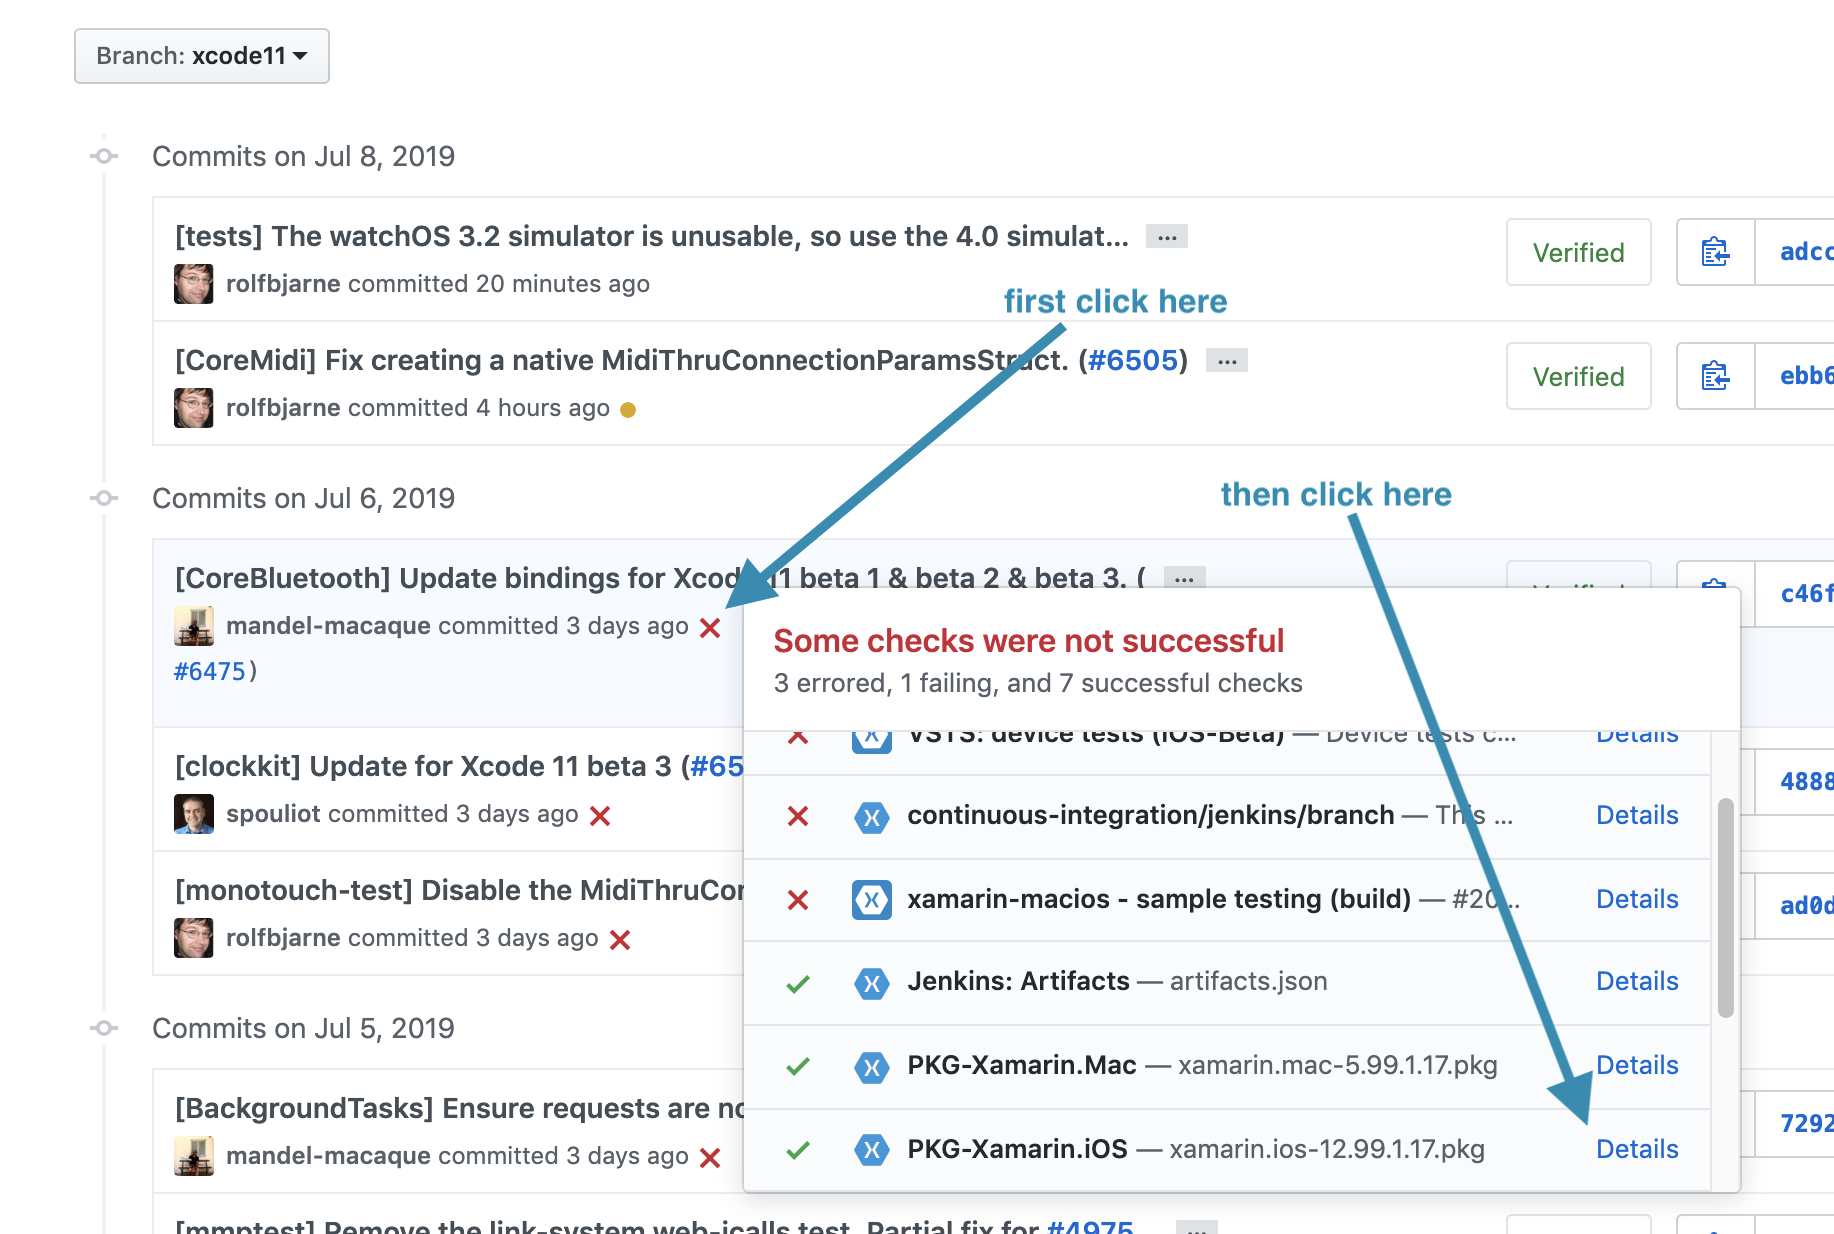
Maybe not - particularly if your use case isn't the aforementioned 'hot-reloading new PencilKit features in ARKit3 from an embedded REPL'. If you want to beat the preview release cycle, or 'just' want to use the interpreter, you're good. As Alex Soto mentioned on the last community standup (a great watch on if you want to learn more about how Xamarin.iOS is put together), you can go to the xcode11 branch of xamarin/xamarin-macios, and download the builds from any recent commit. Per the standup, the commits in this branch have been through some internal review and the test suites before merging - so although the builds are not official previews, the quality should be reasonable.
So how to decide? A month or so ago I gave a talk on Practical Uses for the Mono Interpreter, and included a separation of the what needs interpreter and what needs SRE:
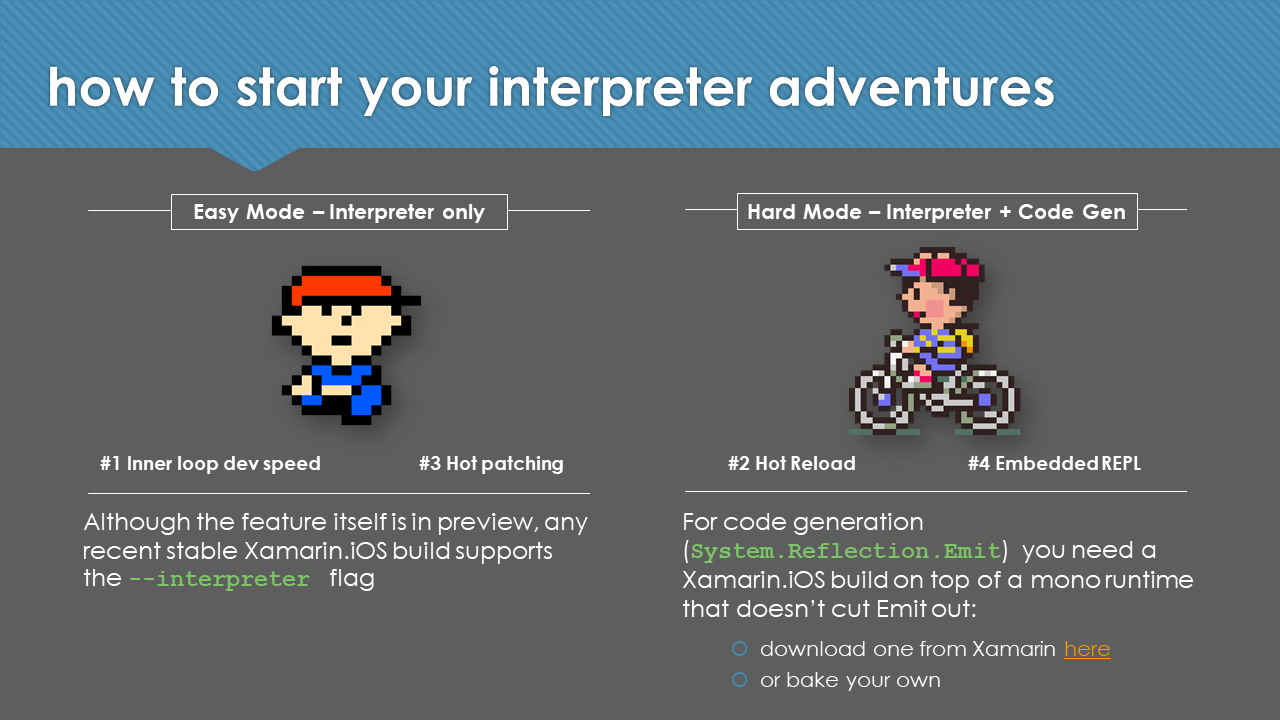
Activities on the left side rely on "using the interpreter to 'execute' IL (i.e. non AOT'd code)". This is what you get from --interpreter and is possible in all Xamarin.iOS builds today, including the previously mentioned xcode11 branch builds. Activities on the right side rely on "generating IL, then using the interpreter to 'execute' it", which requires Reflection.Emit is left in the Mono runtime. Alongside the original interpreter announcement, the Xamarin team made sure the Xamarin.iOS 12.7.1.x series of builds included the appropriate bits. IL generation is a mechanism used by hot reload tools like Continuous, and is also useful for enabling REPL-like environments and arbitrary runtime code execution. If you want to play with these kind of things - on the device then yes, you do need to make your own build and should keep reading.
Baking a Xamarin.iOS version with Reflection.Emit (SRE) included
Building your own version of Xamarin.iOS sounds scary, but it's actually pretty straightforward. It's also well documented on the repo wiki, so besides the two changes needed to enabled SRE, I won't be telling you too much more than what you can find there - but I will give you the step by step.
It probably goes without saying, but don't use your custom build of Xamarin.iOS for anything important. You almost certainly don't want to cut release app builds with it - so if you put this on a machine that also acts as a build agent, make sure to take it out of the queue. You can undo the changes we make here by rolling back to a Stable channel build in VS4Mac, but I'm not sure how thorough of a rollback that is (it could be fine, I just don't know) - so continue at your own risk.
Depending on how many of the prerequisites you have, how fast your internet is, and how fast your machine is, I'd expect below steps to take between one and three hours.
Step 1: Have a Mac running Mojave
Catalina drops 32-bit application support and won't run Xcode 9.4. But, Xamarin still relies on/supports a few 32 bit pieces. Xamarin is planning on deprecating all 32-bit support in the true Xamarin.iOS 13.x releases, so this restriction will only be in place during the preview period. The upshot is you need to create your build on Mojave at the moment - don't waste time like I did trying to work around it.

Step 2: Download all the Xcodes
If you're already doing Xamarin.iOS work, you probably at least have Xcode 10 now. We don't need that where we're going, but we do need Xcode 9.4 and Xcode 11 beta X - where X matches the beta release you're targeting. X is is determined by Apple's releases, the Xamarin Mac/iOS team progress and which xamarin-macios commit you build off. At the time of writing, the latest commits in xcode11 are targeting Xcode 11 beta 3. If you want to go back to an earlier commit (e.g. the one that matches the current first preview), you'd need beta 2.
I like to use xcode-install to get different versions of Xcode, but it can't handle the current betas. Rather than dig around the Apple Developer portal for the download links, I recommend using https://xcodereleases.com to quickly get the versions you need.
Once you have both builds, make sure they end up in Applications suffixed with the version. For example:
- Xcode 9.4 - Xcode94.app
- Xcode 11 Beta 3 - Xcode11-beta3.app
Your Applications folder might look a bit like this:

Step 3: Clone xamarin-macios
In Terminal, navigate to a place you like to put repos (I like ~/Source) and clone xamarin/xamarin-macios:
git clone --recursive https://github.com/xamarin/xamarin-macios
Wait some time while the repo clones, then cd in to the folder, and change to the xcode11 branch, OR checkout the specific commit that you're interested in.
cd xamarin-macios
git checkout xcode11
(If you wanted to build a preview that matches the first officially released preview but with SRE, you'd checkout 903c3eec31bc7c9f819f958df5f2a567b2d30631)
Step 4: Set up dependencies
This is pretty much taken straight from the build guide. The xamarin-macios repo has a handy script called system-dependencies.sh which checks for the presence of a build-friendly environment and can automatically resolves some issues, or suggests the resolution. I usually run with the --provision-all flag to get this outcome:
./system-dependencies.sh --provision-all
If it's your first time building for the preview, it's likely that you'll need to run xcode-select to point at your preview Xcode. The system-dependencies.sh script will give you the exact invocation, so you can copy it from there. Again straight from the guide, you also need a few other dependencies which can be installed using HomeBrew. If you don't already have HomeBrew you can use this command to install it (the official HomeBrew page also directs you to install it in this manner):
ruby -e "$(curl -fsSL https://raw.githubusercontent.com/Homebrew/install/master/install)"
Then install the needed bits:
$ brew update
$ brew install libtool autoconf automake bison flex cmake
With those installed, we're ready to start making our changes.
Step 5: Update tools/mtouch/mtouch.cs (optional, for now)
As I mentioned earlier, there are two changes we need to make to get SRE powers. One is in the configuration of our Mono build, which we'll look at shortly. The other is in the argument handling of mtouch.cs, which currently prevents us from passing --enable-repl to device builds and builds with the linker enabled.

These restrictions make sense in an AOT only world, but when we have interpreter powers they get in our way, so we can remove these lines. I say this step is optional because the handling of the --interpreter flag currently automatically adds --enable-repl. However, it was not this way prior to the 12.7.1.x series of builds, and it may change again in the future - strictly you don't need --enable-repl to make use of the interpreter and may prefer to also remove that additional logic from the --interpreter flag. In any case, I've included this step in case it becomes neccessary in the future.
Step 6: Build with SRE in (technically, without SRE out)
At this point, we're more or less ready to go. All we have to do is remove the removal of SRE. There are probably many ways that this can be done; my approach is to take a sledgehammer to external/mono/configure.ac. Among other things, this file determines which defines are set on the mono build, including DISABLE_REFLECTION_EMIT, which we can see is used across various files to bake out the capability.
The heavy handed solution is to just remove the tests that apply the flags - regardless of what is being built - at the lines that look like this:

The challenge is that when we call make world, the external/mono submodule will be reset to a specific commit, so changing it before then will have no effect. There is probably a better way to do it, but since we're only doing it once, my approach is to just update the file after the submodule has been reset. To do that:
- run
make world - wait until you see that
external/monohas been checked out (the first time this will take a while)
- press
Control+Zto pause the script and return to the prompt - make the change to external/mono/configure.ac
- run
fgto resume execution.
Now we're good to go.
Running make world takes a l o o o n g time, so be patient. I've found that from time to time it fails when running tests, but that is not necessarily fatal, and a subsequent make all -j8 usually succeeds. Once the build succeeds, two commands (again straight from the build guide) will get your new Xamarin.iOS build installed:
make fix-install-permissions # probably only needed the first time
make install-system
Seeing something like this tells you it should have worked!

If you want to go back, 'updating' back to a stable channel build using VS4Mac should do the trick. I'm not sure whether it is a completely clean rollback though.
Step 7: Try it out!
If you made it this far, congratulations! You're ready to try your new SRE-powered build. First you should check that everything looks hunky dory in the About window. Note that if you provisioned all as instructed, you may find you now have a Visual Studio For Mac (Preview) app, and should probably use that.
You can tell that your version is installed by checking the build date (should be today if you built it today), and that the hash matches the commit hash you built against.  You can now try using the interpreter samples, or techniques I've talked about in previous posts. And of course, you can use them with new iOS13 features, like PencilKit and ARKit3. So I finally do get my REPL Arkit PencitKit extravagana: